For each operating system, the device configuration process is completed in three steps:
- Proceeding to a device diagnostic check
- Verifying the supported platforms
- Installing lock-down browsers
Step 1 – Proceeding to a device diagnostic check
A pre-administration hardware check will be available from the student login page of the e-assessment system to help identify devices which may not run well with the SEB or Kiosk lockdown browsers, or the alternative access to the e-assessment.
Step 2 – Verifying the supported platforms
| Operating System | Supported Browser List |
|---|---|
| Windows(Microsoft) | Google Chrome—updated version Mozilla Firefox—updated version Microsoft Edge—updated version |
| Mac OSX 10.13.6High Sierra or higher(Apple, MacBook) | Safari—updated version Google Chrome—updated version Mozilla Firefox—updated version |
| Mac iOS(Apple, iPad) | Safari—updated version |
| Android(tablet) | Google Chrome—updated version |
| Google Chrome(Chromebook) | Google Chrome—updated version |
Each combination of an operating system and a device require:
- a different browser locking software
- a different installation process
Step 3 – Installing the lock-down browsers
SafeExamBrowser
The SEB is a specialized web browser that restricts students’ access to external tools and resources while they are taking the OSSLT. The SEB-configuration file regulates access to system functions, other applications and other settings while also pointing the SEB to the OSSLT and performing a special “handshake” to validate security.
Option 1 – Installing and loading SEB on macOS
- Ensure that your operating system version is higher than 10.13.6 (see Find out which macOS your Mac is using).
- Download the macOS SafeExamBrowser.
- Open the SEB-configuration file.
- Enter the password in the login screen.
Option 2 – Installing and loading SEB on iOS
- Download the SafeExamBrowser App in the App Store.
- Download the SEB-configuration file.
- In the Downloads folder of your iPad, open the SEB-configuration file.
- Enter the SEB password.
- Log in with your email and password.
Option 3 – Installing and loading SEB on Windows
- Download the SafeExamBrowser Installer.
- Run the SafeExamBrowserInstaller.exe file.
- Follow the instructions of the InstallShield Wizard.
- Open the SafeExamBrowser.
5. Follow the instructions of the InstallShield Wizard.
6. Open the SafeExamBrowser.
7. Open the SEB-configuration file.
8. Enter the password in the login screen.
Configuring Chromebooks
There are two methods to configure Chromebooks in order to administer the EQAO assessments. Each method has a set of pre-requisites. Use the following table to determine which configuration method applies to your devices and follow the corresponding instructions in the following sections.
| Device Management | System Requirements | Configuration Method |
| Centrally Managed: All Chromebooks are configured by a single Google Chrome Admin Account. | Chrome Admin Console Chrome Enterprise Google’s KIOSK Mode | Kiosk Application |
| Locally Managed: Chromebooks are configured individually by a user with access to the device directly. | Assessment Lock Extension from Chrome Webstore | Assessment Lock Chrome Extension |
Kiosk Application (Centrally Managed with Google’s KIOSK Mode)
This installation method will only work for Chromebooks that are centrally managed within Chrome’s KIOSK Mode. If your Chromebooks are not centrally managed via Chrome Admin Console & Google Chrome’s KIOSK Mode, please proceed to the next section Assessment Lock (Locally Managed with Individual Devices).
1. Login your Google Admin Console Account (admin.google.com)
2. Navigate to Devices -> Chrome -> Apps & Extensions.

3. Select the KIOSKs tab.
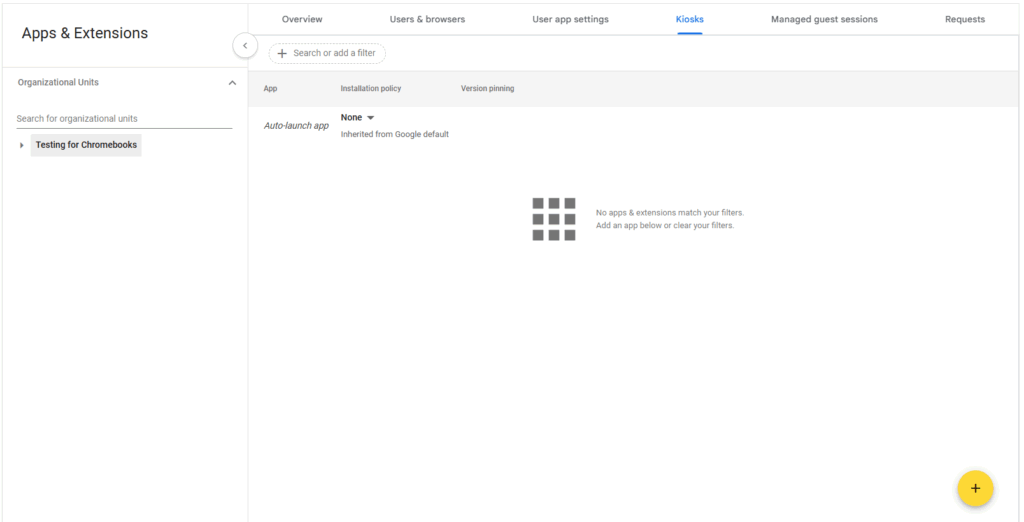
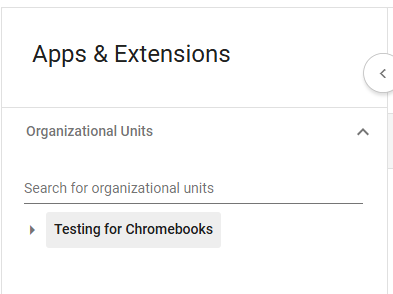
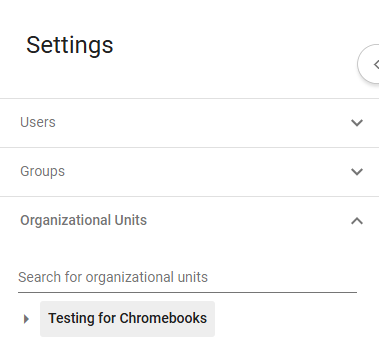
4. Ensure that the correct Organization Units (groupings of chromebooks) have been selected.
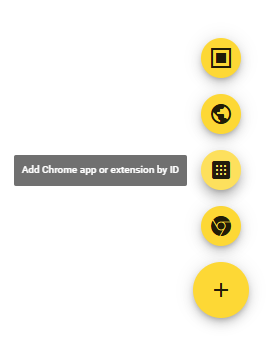
5. Select the yellow plus sign on the bottom left of the page and select Add Chrome app or extension by ID.
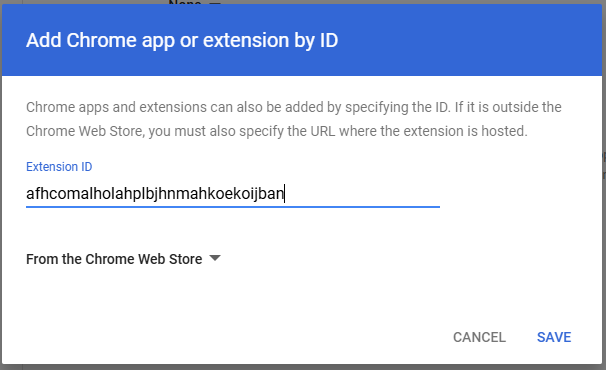
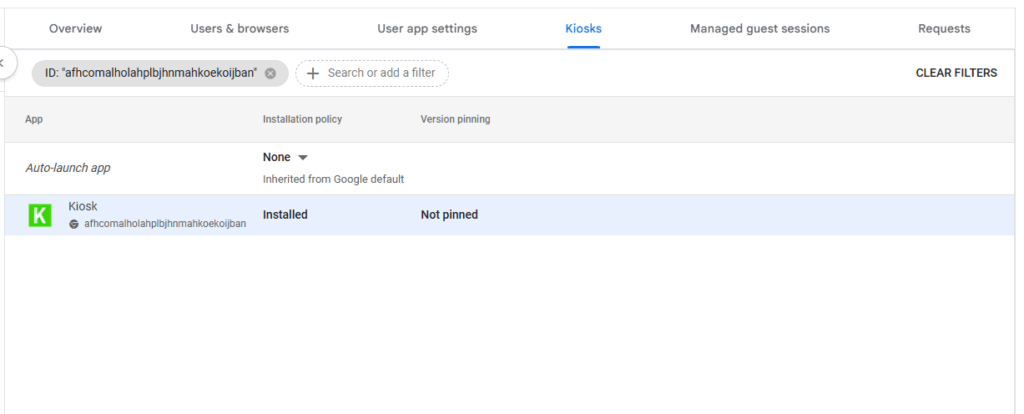
6. In the pop-up that appears, enter afhcomalholahplbjhnmahkoekoijban in the Extension ID and select Save.
7. After selecting Save, the Kiosk application will now be shown in the list of Chrome Applications available through Google Chrome’s KIOSK Mode.
8. In order to configure the Kiosk Application, click on the Kiosk application that was just installed in order to open the right side configuration panel.
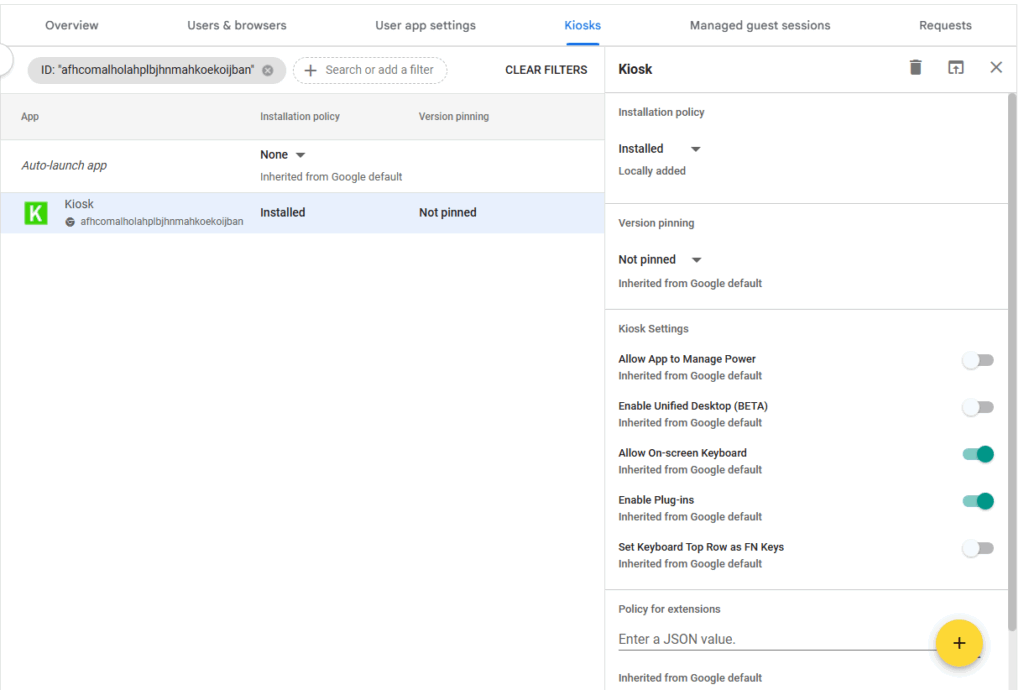
9. In the configuration panel, scroll down to the section called Policy for extensions.
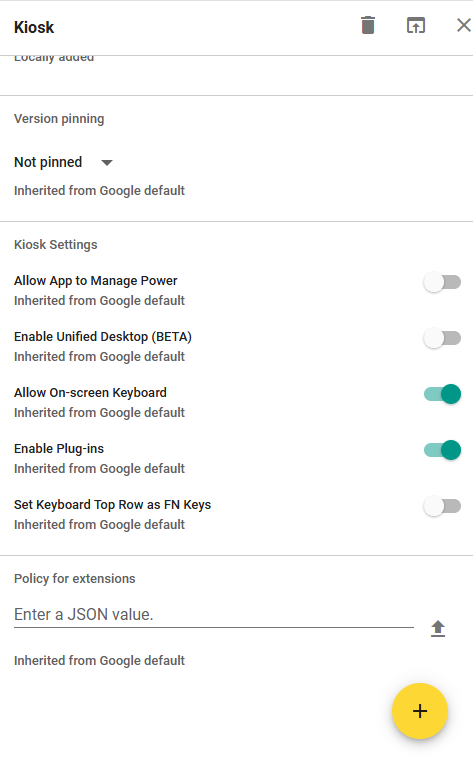
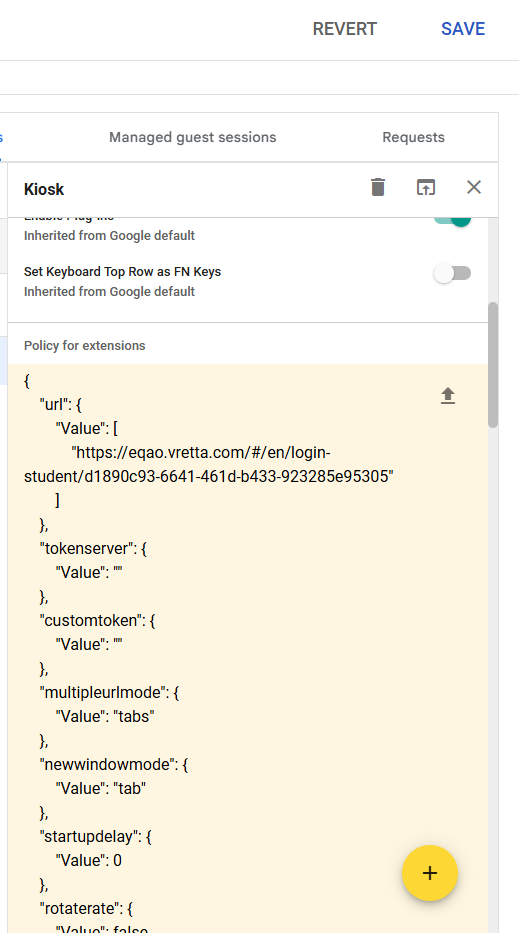
10. Locate the KIOSK policy document for your school or board, which is available from any Administrator or Board account. This document is a JSON file. To configure KIOSK, open that file in a text editor, copy the contents of the file, and paste them into the Enter a JSON Value field. Then click Save at the top of the page.
11. Now that the Kiosk application has been added to Chrome’s KIOSKs and configured, the final step is a crucial settings update. Navigate to Devices -> Chrome -> Settings.

12. Ensure that the correct Organization Units (groupings of chromebooks) have been selected.
13. At the top of the screen select the Device Settings tab.

14. Scroll down to the section called Kiosk Settings.
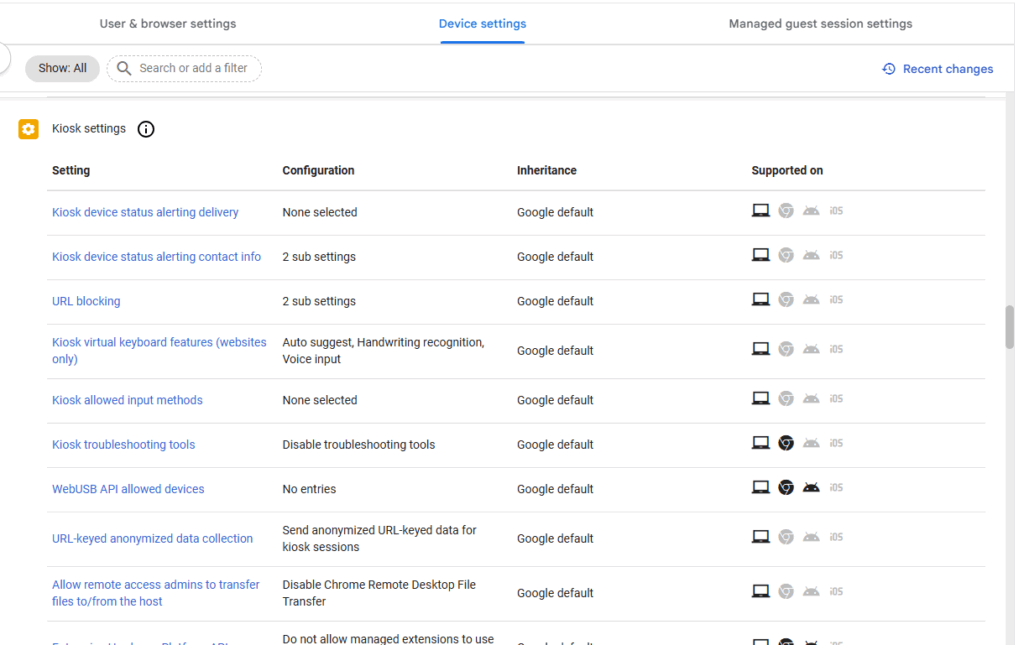
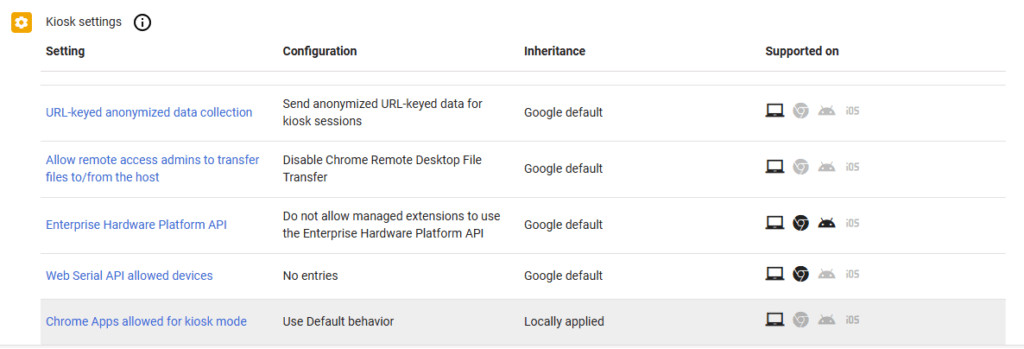
15. Under Kiosk Settings, select the setting called Chrome Apps allowed for Kiosk mode.
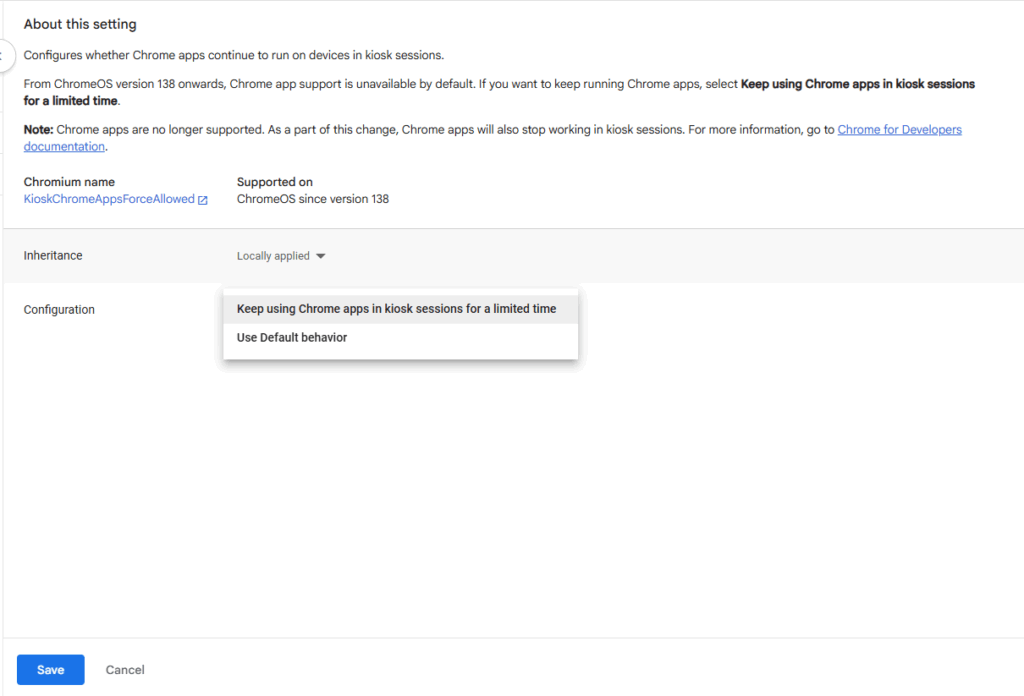
16. On this settings page, go to the Configuration section and ensure that the option Keep using Chrome apps in kiosk sessions for a limited time is selected. Then click Save to confirm the setting.
Assessment Lock Chrome Extension (Locally Managed with Individual Devices)
This installation method will only work for Chromebooks that are NOT centrally managed within Chrome’s KIOSK Mode.
1. Proceed to the Assessment Lock extension via the Chrome Web Store
2. Click the Add To Chrome button, then in the pop up that appears select the Add extension button.
3. To ensure that the extension has been added correctly, select the puzzle pieces on the top right side of the chrome browser and ensure that the Assessment Lock extension is present.
4. On the day of the assessment, the student using the chromebook must log in using this link: https://eqao.vretta.com/#/en/login-student
5. On test day, the Assessment Lock will automatically initialize once the student logs into the assessment and proceeds into the test questions. If the Chrome extension is not active or has been removed, the student will be unable to proceed into the test and it must be added once more in order for the student to proceed.
Alternative access
School administrators will indicate which student(s) require a specific software that is not compatible with either the SEB or the Kiosk application.
Only these students will be permitted to access the assessment through the EQAO login page.
Students not permitted to use this alternative access method will receive an error message if they try to access the assessment in this way.
System Validations (by schools)
School administrators will validate that the lockdown software has been properly installed on the devices.